




In the digital world, your email domain is your identity. It’s how customers recognize you, trust you, and engage with your business. But what happens when malicious actors impersonate your domain to send fraudulent emails? This is where email authentication comes in, acting as the digital passport control for your domain, ensuring only legitimate emails reach the inbox.
This guide breaks down the three core protocols of email authentication—SPF, DKIM, and DMARC—into simple, actionable concepts. You'll learn what they are, how they work together, and how to set them up to protect your brand reputation and boost your email deliverability.
What Is Email Authentication and Why It Matters
Email authentication is a set of technical standards that verify an email's origin is legitimate. It allows a receiving mail server to confirm that an email claiming to be from your domain was actually sent by you or an authorized third-party service (like Google Workspace, Mailchimp, or Salesforce).
For marketers and businesses, the importance of email authentication cannot be overstated:
- Builds Brand Trust: It assures subscribers that emails from your domain are genuine, increasing their confidence to open and engage with them.
- Improves Deliverability: Mailbox providers like Gmail, Outlook, and Yahoo! are more likely to deliver authenticated emails to the inbox, rather than the spam folder.
- Protects Your Reputation: It prevents cybercriminals from using your domain for phishing scams, protecting your customers and preserving your brand's integrity.
Email authentication is the first line of defense against phishing, where attackers send fraudulent emails to trick recipients into revealing sensitive information, and spoofing, the act of forging a sender address to make an email appear as if it's from someone else.

What Are SPF, DKIM, and DMARC?
SPF, DKIM, and DMARC are the three pillars of email authentication. While they work best together, each serves a distinct function.
What Is SPF (Sender Policy Framework)?
SPF is the most foundational of the three protocols. It answers a simple question: Is this mail server authorized to send email on behalf of my domain? It acts like a public guest list for your domain, telling the world which IP addresses are permitted to send your mail.
How SPF Works to Prevent Email Spoofing
- You publish a list: As a domain owner, you create a TXT record in your Domain Name System (DNS) that lists all the IP addresses of the servers authorized to send email for your domain.
- An email is sent: When you send an email, the receiving server sees it came from a specific IP address.
- The receiver checks the list: The receiving server performs a DNS lookup to find your domain's SPF record.
- A match is confirmed: It compares the sender's IP address to the list in your SPF record. If it matches, the email passes the SPF check. If not, it fails.
Real-World SPF Use Cases
Imagine you use Google Workspace for corporate email and Mailchimp for marketing newsletters. Your SPF record would need to include both Google's and Mailchimp's servers to authorize them as legitimate senders.
Example SPF record:
v=spf1 include:_spf.google.com include:servers.mcsv.net ~all
SPF Pros and Benefits
- Easy to Implement: It’s relatively simple to set up a basic SPF record.
- Widely Adopted: Nearly all modern email providers check for SPF.
- Effective First-Line Defense: It’s great at stopping basic spoofing attempts from unauthorized servers.
SPF Cons and Limitations
- Breaks on Forwarding: If an email is forwarded, the new sending server's IP won't be in your SPF record, causing it to fail authentication.
- 10-Lookup Limit: An SPF record cannot generate more than 10 DNS lookups. Exceeding this limit will cause validation errors.
- Doesn't Protect the "From" Address: SPF validates the Return-Path domain, not the visible From: address that users see, leaving it vulnerable to some types of spoofing.
What Is DKIM (DomainKeys Identified Mail)?
DKIM acts as a digital, tamper-proof seal. It answers the question: Was this email altered in transit, and was it actually sent by the domain it claims to be from? It uses cryptographic signatures to verify an email's integrity.
How DKIM Works for Email Security
- Key Generation: A pair of cryptographic keys is generated: a private key that stays on your sending mail server and a public key that you publish in your DNS.
- Digital Signature: When an email is sent, the server creates a unique signature by hashing parts of the email (like the From address, subject, and body) and encrypting it with the private key. This signature is added to the email's headers.
- Verification: The receiving server retrieves the public key from your DNS. It uses this key to decrypt the signature. It then independently hashes the same parts of the received email.
- Match Confirmation: If the decrypted signature matches the server's own calculated hash, the email passes DKIM. This proves the email hasn't been tampered with and originated from a server with access to the private key.
DKIM Pros and Benefits
- High Security: Provides strong cryptographic proof of authenticity and integrity.
- Survives Forwarding: Because the signature is part of the email's content, it remains valid even when forwarded.
- Protects Against Phishing: Verifies that critical parts of the email haven't been modified.
DKIM Cons and Challenges
- Slightly More Complex: Setup can be more involved than SPF, as it often requires configuration within your sending service (e.g., Office 365, SendGrid).
- No Policy: By itself, DKIM doesn't tell the receiving server what to do with an email that fails the check.
What Is DMARC (Domain-based Message Authentication, Reporting & Conformance)?
DMARC is the policy layer that ties SPF and DKIM together. It tells receiving servers what to do if an email fails SPF or DKIM checks and provides reporting back to the domain owner. Think of DMARC as the manager who makes decisions based on the results from SPF (the guest list check) and DKIM (the seal check).
How DMARC Works to Protect Domains
DMARC requires an email to pass either SPF or DKIM, and crucially, it introduces the concept of identifier alignment. This means the domain used in the visible From: address must match the domain validated by SPF or DKIM. This is what stops sophisticated spoofing where the underlying authentication passes but the visible sender address is forged.
DMARC Enforcement Levels
You specify your policy in a DMARC DNS record using the p tag:
- p=none (Monitoring Mode): Instructs receivers to take no action on failing emails. This mode is used purely for collecting reports to see who is sending on your behalf without impacting mail flow. Always start here.
- p=quarantine (Quarantine): Moves unauthenticated emails to the recipient's spam or junk folder.
- p=reject (Reject): Instructs receivers to block and reject unauthenticated emails entirely. This is the most secure level.
DMARC Reporting for Visibility
DMARC provides two types of reports sent to the email address you specify in your record:
- Aggregate (RUA) Reports: XML reports that give you a high-level overview of your email traffic, including IP addresses, authentication results, and email volume.
- Forensic (RUF) Reports: Detailed, real-time reports of individual email failures. Due to privacy concerns, not all providers send these.
DMARC Pros and Benefits
- Complete Control: Gives you the power to decide what happens to unauthorized mail.
- Invaluable Visibility: Reports show you who is sending email using your domain, helping you identify legitimate services and malicious actors.
- Brand Protection: The only way to fully protect your visible From: domain from being impersonated.
DMARC Cons and Considerations
- Requires Careful Implementation: Moving to reject too quickly without proper monitoring can block legitimate emails.
- Complex Reports: Raw RUA reports are in XML format and difficult for humans to read and analyze without a dedicated tool.
SPF vs DKIM vs DMARC – Key Differences Explained
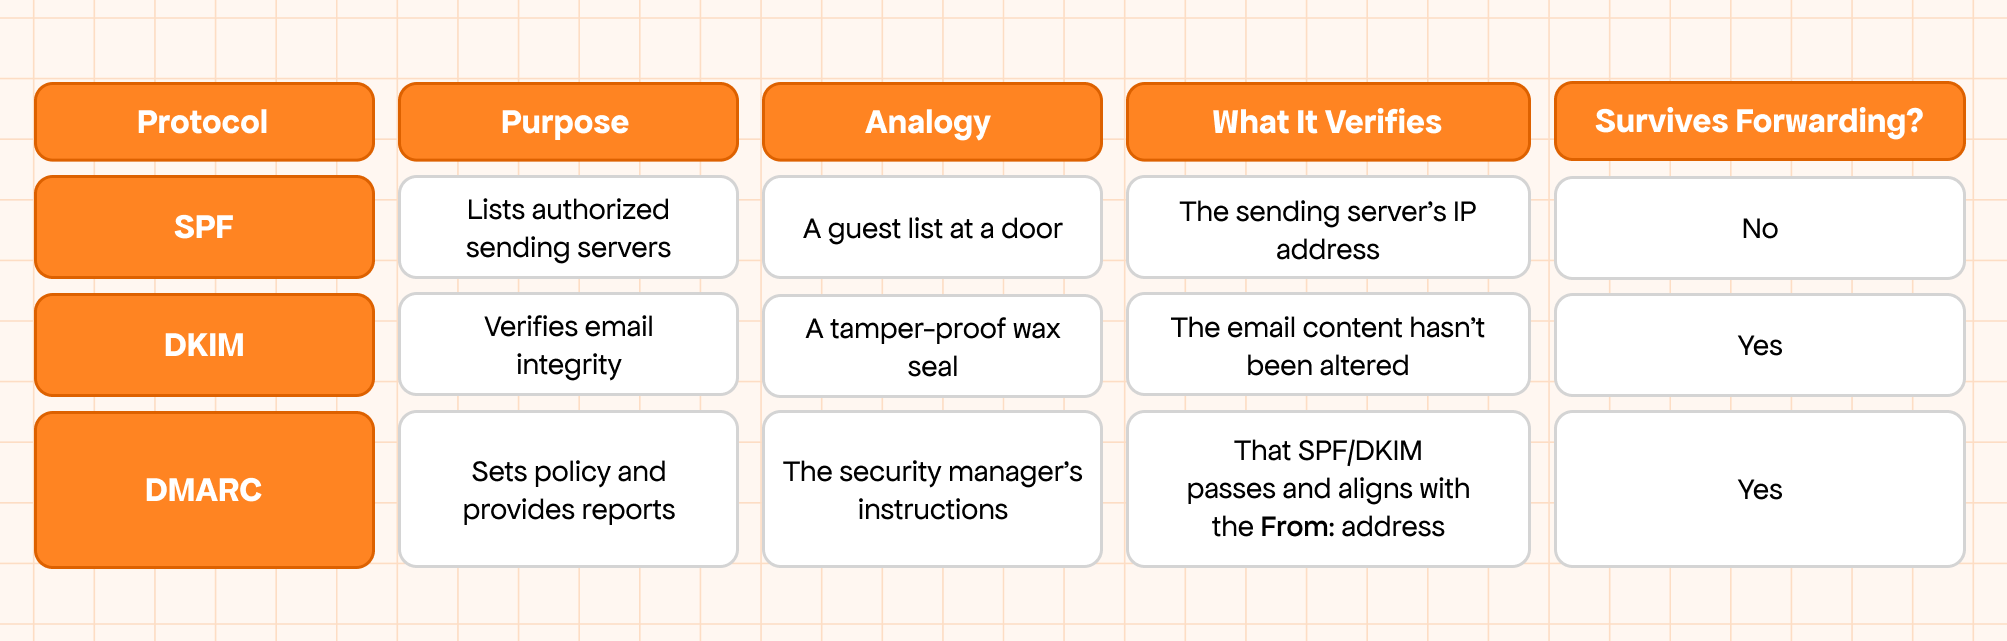
SPF in Email Authentication
Focuses on the "who"—validating the sending server.
DKIM in Email Authentication
Focuses on the "what"—validating the message's integrity.
DMARC in Email Authentication
Focuses on the "how"—telling receivers how to handle failures and providing feedback.
How SPF, DKIM, and DMARC Work Together to Stop Email Fraud
SPF, DKIM, and DMARC are not interchangeable; they are designed to be used as a layered security strategy.
An email arrives at a receiving server.
- The server checks for an SPF record to see if the sending IP is on the authorized list.
- It then checks for a DKIM signature to verify the message hasn't been altered.
- Finally, it checks the DMARC policy. DMARC verifies that at least one of SPF or DKIM passed and that the domain used in that check aligns with the From: address. Based on the domain's DMARC policy (none, quarantine, or reject), it then takes the appropriate action.
This layered approach closes the loopholes that each protocol has individually, providing robust protection and significantly boosting your email deliverability by signaling to mailbox providers that you are a legitimate, security-conscious sender.
Where Are SPF, DKIM, and DMARC Records Stored?
All three authentication protocols are configured by adding TXT records to your domain's DNS (Domain Name System). The DNS is the public internet directory that translates human-readable domain names (like yourdomain.com) into machine-readable IP addresses.
Because these records are public, any receiving mail server in the world can look them up to verify your emails. Correct placement and syntax in your DNS settings are critical for them to work correctly.
How to Set Up SPF, DKIM, and DMARC for a Domain
Step-by-Step Guide to Setting Up SPF
- List Your Senders: Identify every service that sends email on your behalf (e.g., Google Workspace, Outlook 365, Mailchimp, SendGrid, Zendesk).
- Gather SPF Mechanisms: Each service will provide its own SPF value, usually in the format include:domain.com.
- Construct Your Record: Create a single TXT record starting with v=spf1. Add the include: mechanisms for each sender. End the record with a "soft fail" (~all) or "hard fail" (-all). Start with ~all.
- Example: v=spf1 include:_spf.google.com include:servers.mcsv.net ~all
- Publish in DNS: Add this as a TXT record for your root domain (@ or yourdomain.com). You can only have one SPF record per domain.
Step-by-Step Guide to Setting Up DKIM
- Enable DKIM in Your Sending Service: Most email service providers (ESPs) have a section in their admin panels for email authentication. Find the option to enable or generate DKIM keys.
- Get the DKIM Record: The service will provide you with a DNS record to publish. It is usually a CNAME or TXT record and includes a unique "selector" (a name for the key) and the public key value.
- Example Name: s1._domainkey.yourdomain.com
- Example Value: v=DKIM1; k=rsa; p=MIGfMA0G...
- Publish in DNS: Add the provided record to your DNS. Unlike SPF, you can have multiple DKIM records on your domain, as each sending service will use its own unique selector.
Step-by-Step Guide to Setting Up DMARC
- Ensure SPF and DKIM are in Place: DMARC relies on them, so set them up first.
- Create Your DMARC Record: Start with a monitoring-only policy. The record is a TXT record for _dmarc.yourdomain.com.
- Hostname/Name: _dmarc
- Value: v=DMARC1; p=none; rua=mailto:dmarc-reports@yourdomain.com
- Publish in DNS: Add this TXT record.
- Monitor Reports: Analyze the aggregate (RUA) reports you receive to confirm your legitimate email streams are passing authentication.
- Enforce Policy: Once you are confident that all legitimate mail is authenticated, you can gradually move to p=quarantine and eventually p=reject.
How to Configure Records in Cloudflare (and other DNS providers)
- Log in to your DNS provider (Cloudflare, GoDaddy, Namecheap, etc.).
- Navigate to the DNS management section for your domain.
- Click "Add Record."
- Select "TXT" as the record type.
- Enter the required information:
- For SPF: Name/Host = @ (or your domain). Content/Value = Your SPF record string.
- For DKIM: Name/Host = The selector provided (e.g., s1._domainkey). Content/Value = The key value provided.
- For DMARC: Name/Host = _dmarc. Content/Value = Your DMARC record string.
- Save the record. DNS changes can take up to 48 hours to propagate globally, but are often much faster.

How to Check If an Email Passed SPF, DKIM, and DMARC
You can manually inspect any email to see its authentication results. Here’s how to do it in Gmail as an example:
Step 1 – Open Full Email Headers
- Open the email in Gmail.
- Click the three vertical dots (More options) next to the reply button.
- Select "Show original."
Step 2 – Look for SPF, DKIM, and DMARC Results
A new tab will open with the raw email source. Scroll down to the Authentication-Results header. You will see a summary of the checks:

This shows a pass for all three protocols, indicating a properly authenticated email.
Step 3 – Use an Email Authentication & DMARC Analyzer Tool
Manually checking headers is tedious, and analyzing XML reports is nearly impossible at scale. This is where automated tools come in.
Struggling to set up or verify your records? A simple mistake can block your emails. Use our free Domain Health Checker to instantly check your domain's SPF, DKIM, and DMARC configuration and identify any issues.
How to Verify Correct Configuration
Beyond checking a single email, use a dedicated tool to:
- Validate the syntax of your DNS records.
- Check for the SPF 10-lookup limit.
- Ensure your DMARC policy is correctly published.

Choosing the Right Email Authentication Solution for Your Business
Implementing SPF, DKIM, and DMARC is non-negotiable for any serious business. However, managing it effectively requires the right tools.
- For Marketers: The primary goal is deliverability. A DMARC analyzer tool helps you ensure all your marketing platforms are properly authenticated, maximizing inbox placement and campaign ROI.
- For IT & Security Teams: The focus is on preventing domain abuse. These tools provide real-time alerts on spoofing attempts and simplify the process of reaching a reject policy.
- For Compliance Teams: DMARC is increasingly seen as a baseline for compliance. A dedicated solution provides the audit trails and reporting needed to prove the domain is secure.
The main benefit of using a dedicated DMARC analyzer tool like VitaMail is that it translates the cryptic XML reports into human-readable dashboards. You can easily see which emails are passing or failing, identify unauthorized senders, and get step-by-step guidance on how to fix issues and safely move to DMARC enforcement.